Thursday, July 19, 2012

Chocolate Mint Triangles

CHOCOLATE! There is absolutely nothing bad associated with that word in my mind. I am a HUGE fan. It runs in my family- my mother used to keep chocolate chips or M & M's in her desk at work and in the fridge at our house to eat whenever.  The majority of the recipes we made together involved chocolate. So today I am talking about how to make a chocolate dessert with a flavor compliment- mint.

The original recipe uses Hersey chocolate, which I deem as non-chocolate in my book. Yes, I am a chocolate snob. Hersey's chocolate has just always tasted odd to me so I have avoided it mostly. No offense Hersey; I like your recipe, but I consider eating your chocolate 'slumming it.'

I tweaked the recipe a bit, because I always say that your key ingredients should be the very best you can afford. I switched out the Hersey's syrup for Santa Cruz Organic Chocolate Syrup, which is AMAZING! You can get it at your local health food store, usually. I couldn't find creme de menthe, so I used food coloring and peppermint flavoring. Finally, I switched out the Hersey Chocolate Chips for Guittard Semi-Sweet Chocolate Chips.


Here's the recipe, modified from Hersey's Kitchen:
Chocolate Mint Dessert

Ingredients
  • 1 cup all-purpose flour
  • 1 cup sugar
  • 1/2 cup (1 stick) butter or margarine, softened
  • 4 eggs
  • 1-1/2 cups Santa Cruz Organic Chocolate Syrup (Believe me, it DOES make a big flavor difference!)
  •  
  • MINT CREAM CENTER (recipe follows)
    • 2 C powdered sugar
    • 1/2 C (1 stick) softened butter or margerine
    • 2 Tbsp creme de menthe ( OR 1 Tbsp water + 3/4 tsp mint extract and 3 drops green food coloring)
  • CHOCOLATE GLAZE (recipe follows)
    • 6 Tbsp butter/margarine
    • 1 C Guittard Semi-Sweet Chocolate Chips

Directions

  1. Heat oven to 350° F. Grease 13x9x2-inch baking pan.
  2. Combine flour, sugar, butter, eggs and the whole bottle of syrup in large bowl; beat until smooth. Pour batter into prepared pan.
  3. Bake 25 to 30 minutes or until top springs back when touched lightly in center. Cool completely (I mean completely because you don't want your cream center or glaze to melt when you put it on) in pan on wire rack. 
  4. Spread MINT CREAM CENTER on cake. Cover; refrigerate. 
  5. Pour CHOCOLATE GLAZE over chilled dessert. Cover; refrigerate at least 1 hour before serving. Cover; refrigerate leftover dessert. About 12 servings.
  6. Cut dessert into about twelve 3-inch squares; cut each square diagonally into halves. About 24 triangles.

    MINT CREAM CENTER: Combine all ingredients in medium bowl; beat until smooth.

    CHOCOLATE GLAZE: Melt 6 tablespoons butter or margarine and 1 cup Guittard Semi-Sweet Chocolate Chips in small saucepan over very low heat. Remove from heat; stir until smooth. Cool slightly.
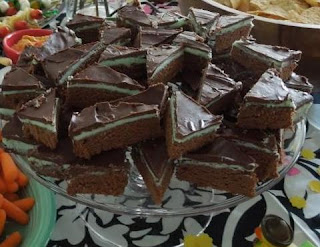
People were over-the-moon for this dessert! It was a big hit. I would make it over and over again! No complaints here. :-)

Strawberry Key Lime Pie

So there has been a gap in my regular baking schedule- but it's a good gap. I got a job! The blog got put on hold for a bit, while I got adjusted to the new schedule. So let's backtrack a bit to some recipes from my past. Today we're talking Strawberry Key Lime Pie.

 
 Below is the recipe I used:

Recipe source: http://www.pieaday.com/2009/may/may_4th-8th/strawberry_keylime.html#
Ingredients:

Graham Cracker Crust (don't prebake),

1 cup pureed organic strawberries (I added a splash of Coconut Rum to this because it was just lying around and coconut sounds great, right? However, I don't suggest the use of alcohol in this recipe..I'll explain below)

1/2 cup key lime juice

1 12 oz. can of sweetened condensed milk

3 egg yolks

Preheat oven to 350 degrees.

 1) Puree strawberries. (I used a blender and it worked fine). If it won't blend, add a little water.
 2) Squeeze your key limes. I found that 4 key limes= about 1/8 Cup, so I think I used 16. It's a bit tedious, but worth it.
  
3) Add sweetened condensed milk, strawberry puree, 3 egg yolks to the key lime juice and whisk until well-mixed. 

4) Pour into uncooked graham cracker shell. Bake for 20 minutes. 

5) Chill in the fridge for a couple hours before serving, in order to allow pie to set. 

 After chilling I sliced the rest of the fresh organic strawberries on the bias to place on top of the pie. You may ask why I bought organic strawberries- my answer is that I think your featured ingredient should be the best that you can find. In this case it's a strawberry-key lime pie, so I put in the extra effort to find organic strawberries for better flavor and sourcing. It also just makes me feel better to know the fresh ingredients didn't get slathered in pesticides.

After bringing this pie to a potluck and having people sample it, I heard a consensus it had an odd aftertaste that just didn't taste quite right for key lime pie. What went wrong? Then I remembered I put coconut rum in the strawberry puree on a whim. I think that is the aftertaste. Considering how little time the pie spends in the oven, I would say that the alcohol didn't bake off entirely, so instead of just getting a coconut flavor, you get the full coconut rum flavor, which is odd with key lime. Lesson of the story- reserve the alcohol for a cocktail later. ;-) Eventually I will remake this recipe sans-rum to see if that indeed is why it has an odd aftertaste.

Sunday, July 1, 2012

Veggie Cashew Quiche

Welcome to my kitchen, dear readers. Let me show you around-there's a cute little 1940's stove, whose pilot light I must kindle each time I want to use the oven. To the right of the stove is the sink, over which is a window I can look out on downtown. I have old kitchen tools hanging on the wall, which I love to pull out and use in lieu of the fancy new gadgets. (My favorite is the hand-cranked egg beater.) The kitchen is the hottest part of my apartment, but I still spend a great deal of time there.You can walk from one side of the kitchen to the other in 4 steps. It's a bit of a juggling act to cook in there.

Today I am making two veggie quiches, which of course result in peas and chopped carrots spread far asunder in my little kitchen. I am rocking out to my Ipod, which I tucked into my apron. Barefoot and sweating, I smash escapee peas between my toes accidentally. Let's be honest-when I bake or cook there WILL be aftermath. In fact, if I may wax philosophical for a moment, I think that creation often emerges from chaos. So when I present that pretty pie with a smile today, no one will know the mess it came from. Until they read my blog. ;-)

 I guess I am in a pie-ish mood, considering in the past 48 hours I have created a strawberry key lime pie (more on that in my next post) and a veggie quiche.

Per usual, I doubled the recipe. Note that I use aluminum foil to cover the edges of the pie shell: this ain't my first rodeo. I have learned uncovered crusts may burn. No bueno. Here's the recipe I have adjusted to my liking.

Veggie Cashew Quiche
Adapted from Confabulation in the Kitchen

* Makes four generous servings or six if paired with side dishes.
* Cook time: 50 mins
* Total time to prepare: 1 hour, 20 minutes.

Ingredients
2 frozen deep dish tart shells
1-16 oz bag frozen peas and carrots
A bit of butter
1/2C- 1 C coarsely chopped cashews
3 tablespoons all-purpose flour
1/2 teaspoon salt
1/2 teaspoon ground black pepper
1/2 teaspoon nutmeg
2 cups shredded cheese (I used a mix of gruyere and mozzarella)
4 eggs, well-beaten
1 1/2 cups milk
1/2 cup sour cream + 1 C Greek yogurt

Directions
1. Heat oven to 400 degrees.
4. In a large skillet, add a bit of butter and peas/carrots. Cook until thawed. Add flour and cook about two minutes, stirring often. Remove from heat and stir in cashews, salt, pepper and nutmeg. Pour mixture into tart shell. (Try to keep it at or below 1/2 way full, to ensure room for the egg mixture. You may have some pea and carrot mix left over, but it's better than overflowing quiche.)


5. In a separate bowl, whisk eggs, milk, sour cream, Greek yogurt and cheese until well mixed. Pour over vegetable mixture and gently mix a bit, so the vegetables are not all at the bottom.
6. Cover edges of pie shell with tin foil, to ensure they don't burn. Place pies on a cookie sheet, in order to be able to move them more easily and to catch any drip-age.
6. Bake 20 minutes, then reduce heat to 350 and bake 10 minutes more. Remove foil from edges and return to oven for 20 mins, or until a knife inserted in center comes out clean.

Enjoy! I will let you know how it fares later.

Saturday, June 30, 2012

Coming Soon to a Kitchen Near You!

Please excuse the lack of posts for a while. I am still getting things up and running.

COMING SOON: Chocolate Mint Triangles, Key Lime Cupcakes with Blackberry Buttercream, Strawberry Key Lime Pie, Lemon Sorbet, Lemon Butter Cookies, Vegetarian Cashew Quiche and more!!


Sunday, June 17, 2012

Welcome and Cheers to What Delicacies Lay Ahead!

Welcome! This blog has materialized out of a calling I feel to compile favorite recipes, writings on what baking/cooking means to me and stories of recipe accomplishments. I am not a professional pastry chef, but I have a love for baking borne of childhood kitchen memories and a thirst for new culinary challenges.

I grew up baking and cooking with my mother in our kitchen. We loved to put music on, don our aprons and make whatever special recipe was called for at the next social gathering. Baking was a time to dance, a time to eat and a time to enjoy each others' company. When my mother suddenly passed away last October, one of the first possessions of hers I took home was her box of family recipes. It contains butter-smeared recipe cards with the old school designs on them, passed down from my grandmother all the way to me. Having lost her, I felt called to relive our times in the kitchen by baking in my little apartment. In short, I was reminded to enjoy life and live it to the fullest- to "eat the damn cake" as another blogger has put it. (Eat the Damn Cake!)

My mother taught me that more butter makes everything better, that it is ok to eat raw cookie dough (it hasn’t killed me yet) and that nothing says lovin’ like something from the oven. I went off to college thinking that everyone knew how to make cookies from scratch and gained many friends in the dorm kitchens.

I remember one year my mom and I fell for the perfect-looking gingerbread house we saw in one of our many home magazines and resolved to recreate it. We spent hours mixing the dough, eating the dough, baking, constructing and decorating the house. The end result was a beautiful house that was entirely inedible. The icing and siding was so hard we would break a tooth if we tried to eat them. But it really didn’t matter to us that we couldn’t eat it. We enjoyed each other’s company making it, laughing at each other covered in flour and goofy from consuming too much icing.

And so I embark on this journey, here chronicling past and present culinary attempts. I will close with one quote that inspired this blog-

“No one who cooks, cooks alone. Even at her most solitary, a cook in the kitchen is surrounded by generations of cooks past, the advice and menus of cooks present, the wisdom of cookbook writers.”
Laurie Colwin

May we continue to bake with joy, surrounded by the wisdom and passion of cooks who came before us.

*Note: Any recipes that are not my own will be provided along with the link or name of their source.